The Kirsten Project | Happy Birthday, Kirsten!

Kirsten A5.jpg
Kirsten E3.jpg

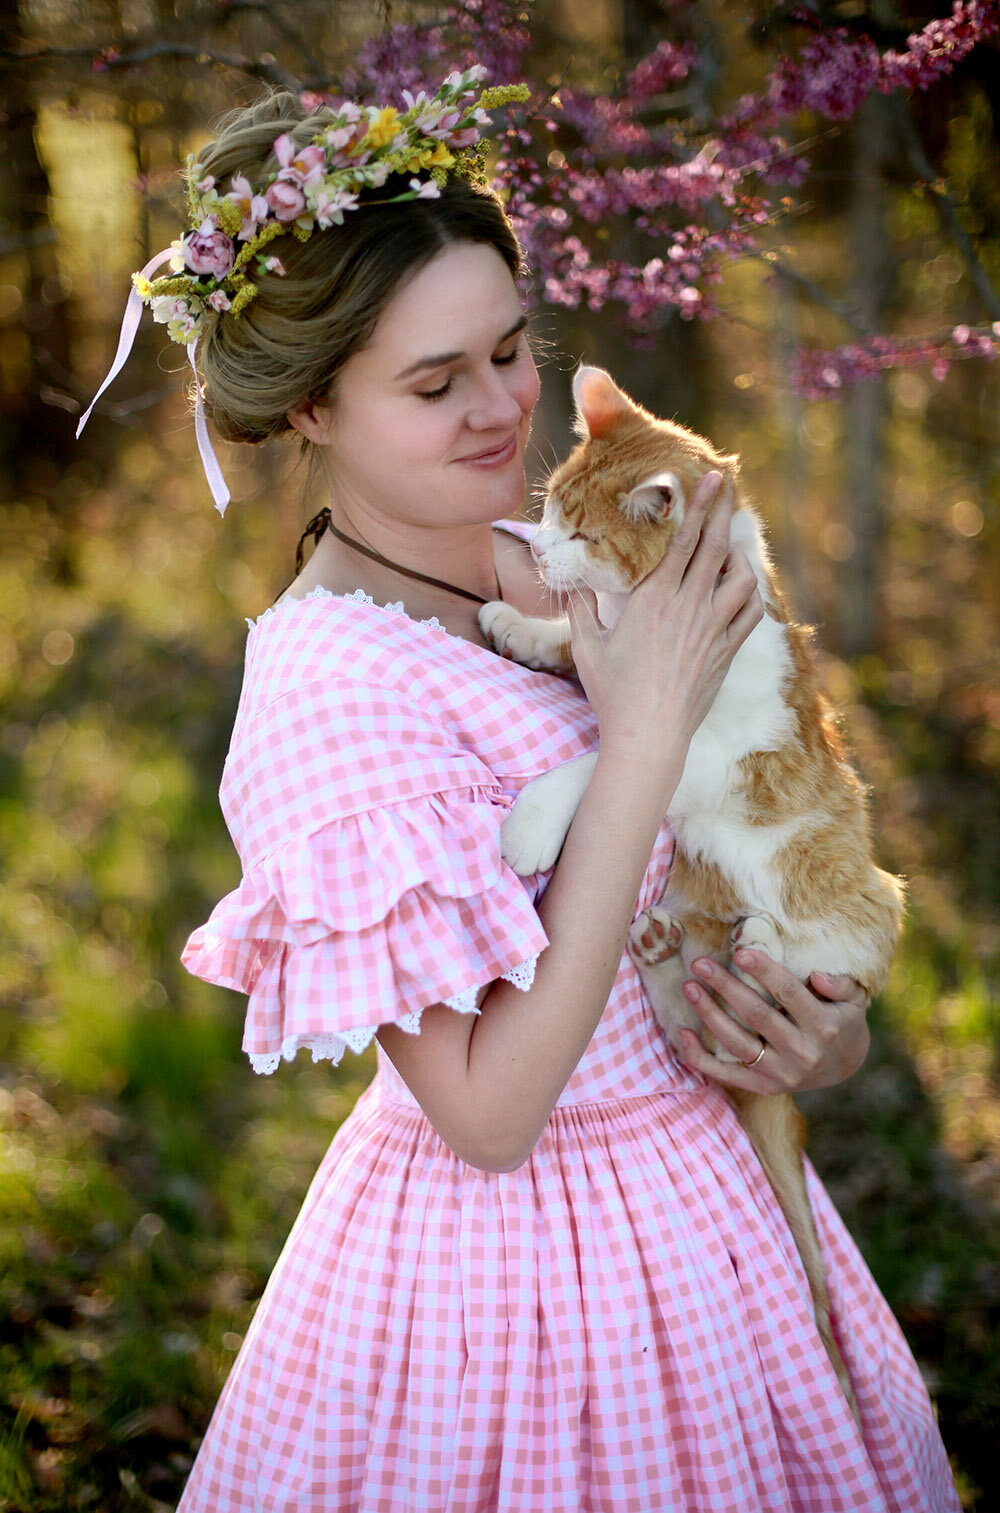
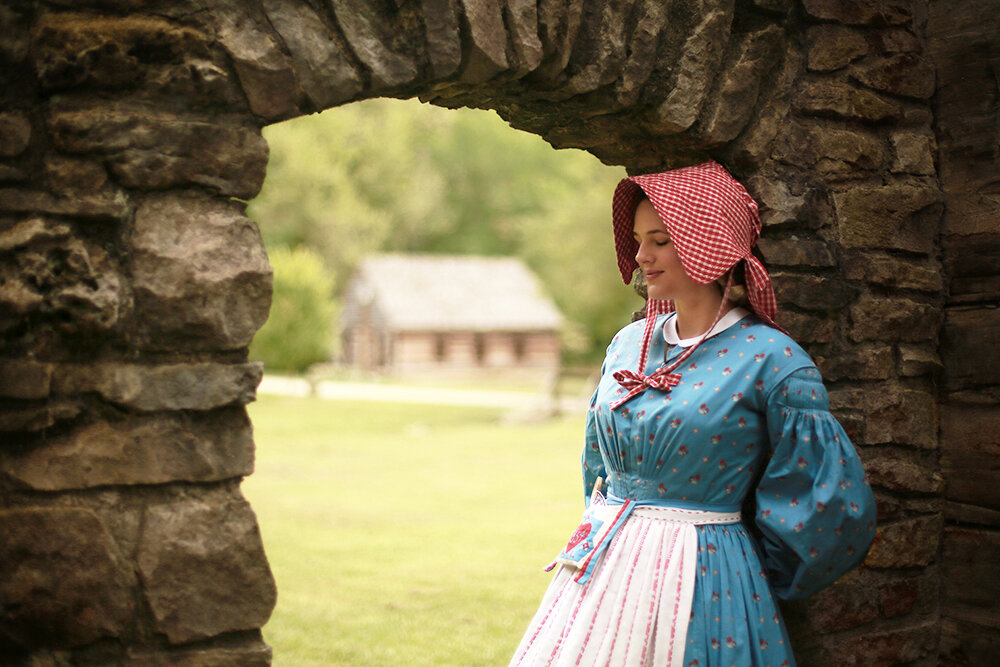
Spring has arrived! The chickens are laying a rainbow of colorful eggs, the redbuds have popped and the fruit trees are blooming! Warmer days lead us outside to play and prepare our gardens for the summer ahead! Between these moments, I’ve been sneaking away time here and there to finish my 1850s spring dress, based off Happy Birthday, Kirsten! and I am so happy with how the project has turned out! I’d love to tell you more about my design process and how I took the original cover art by Renée Graef and translated it into women’s dress informed by the fashion trends of the era. If you haven’t see my research posts on 200 Years of Gingham, Tiered Skirts, Girls’ Dresses, Pink in the 19th century or my intro post, I encourage you to check those out first! This edition of The Kirsten Project requires a little more description, so grab a hot cup of coffee and join me for this springtime delight!

Kirsten+Birthday.jpg
Kirsten Silhouette Flipped.jpg
jess+and+kirsten.jpg

While past my costumes (Meet Kirsten, Kirsten’s Surprise and Changes for Kirsten) have very closely mirrored the illustrations and doll clothes, I’ve taken more artistic liberties based on historical sources with the adult version of Kirsten’s springtime dress.

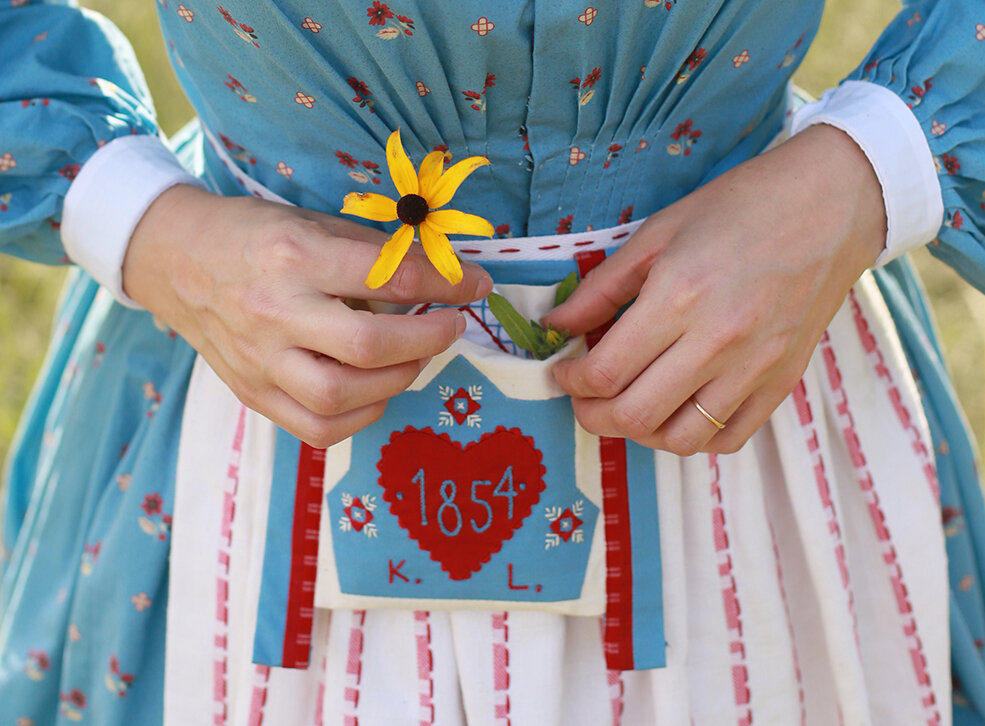
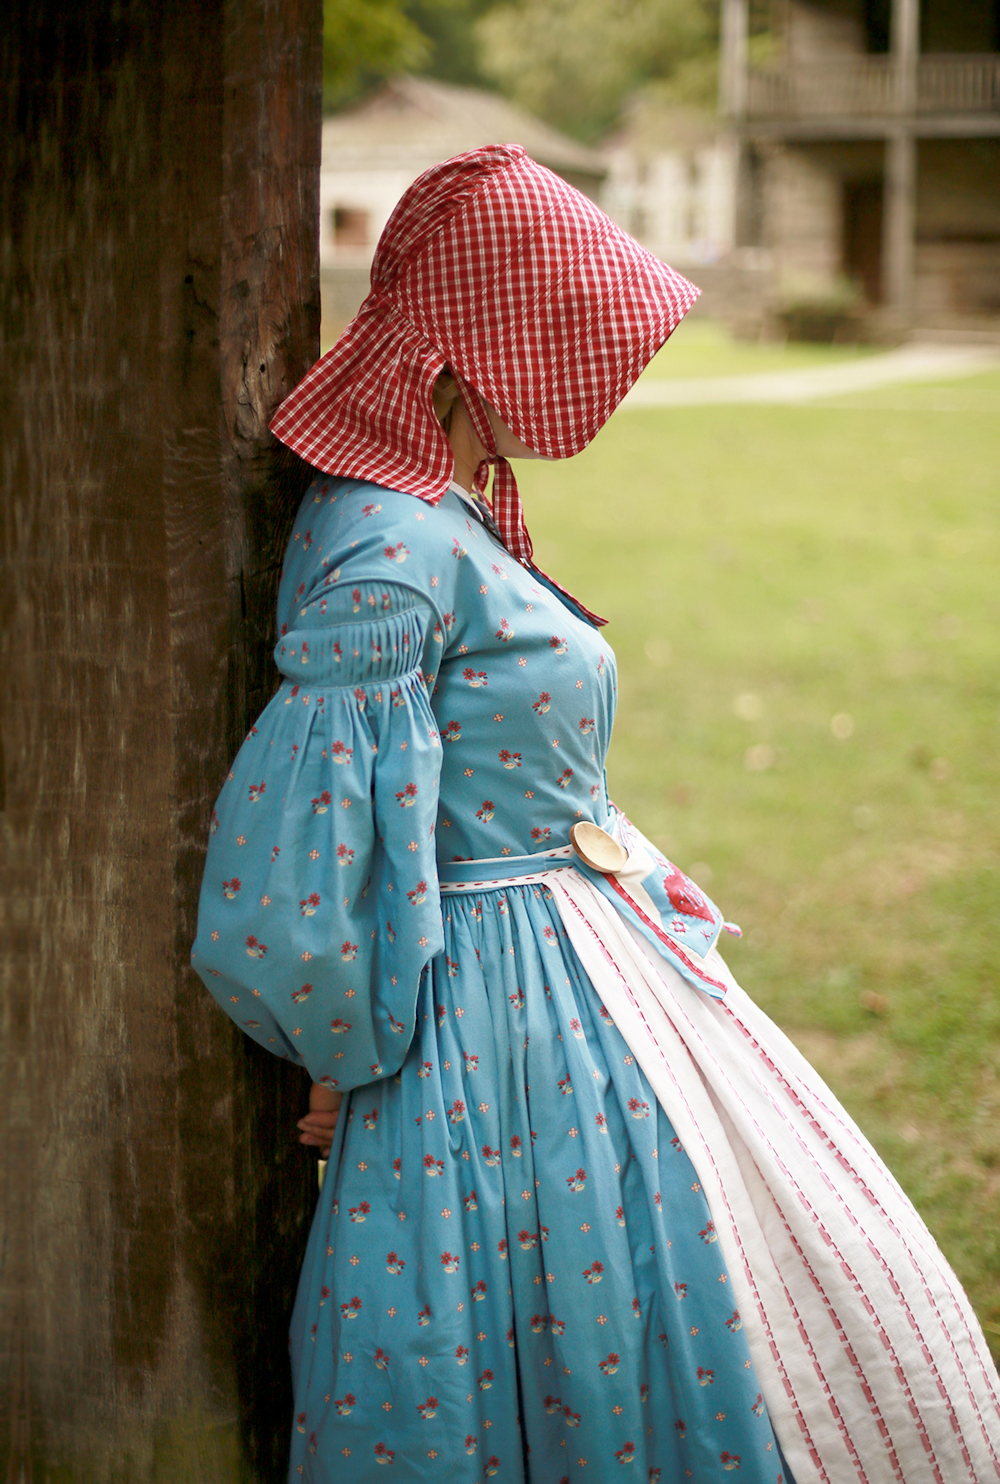
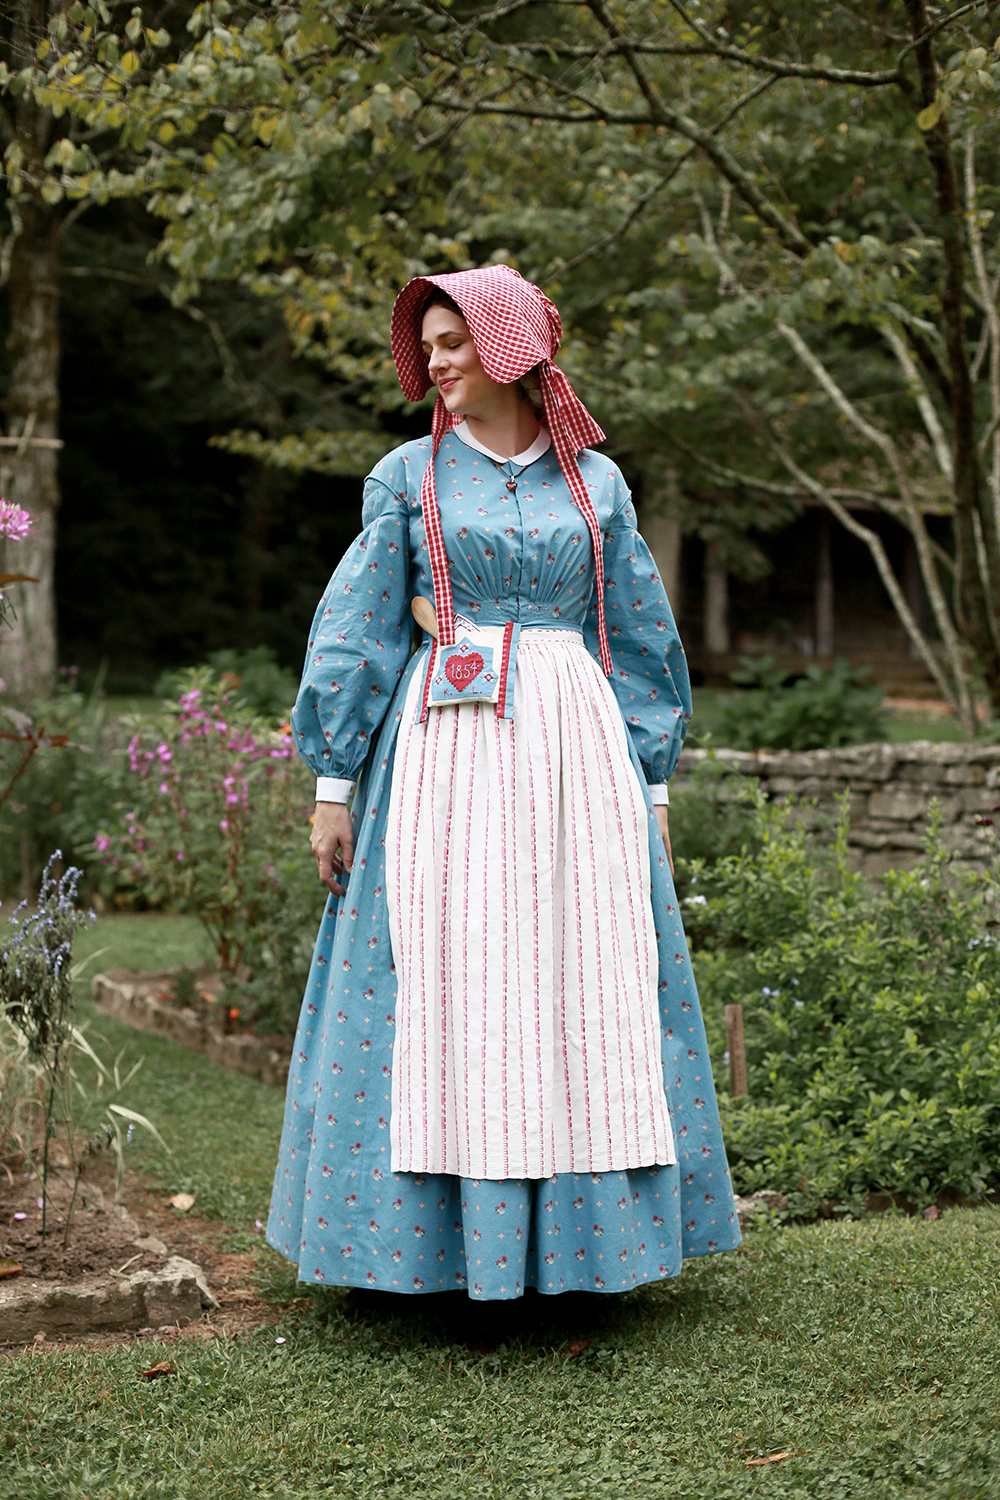
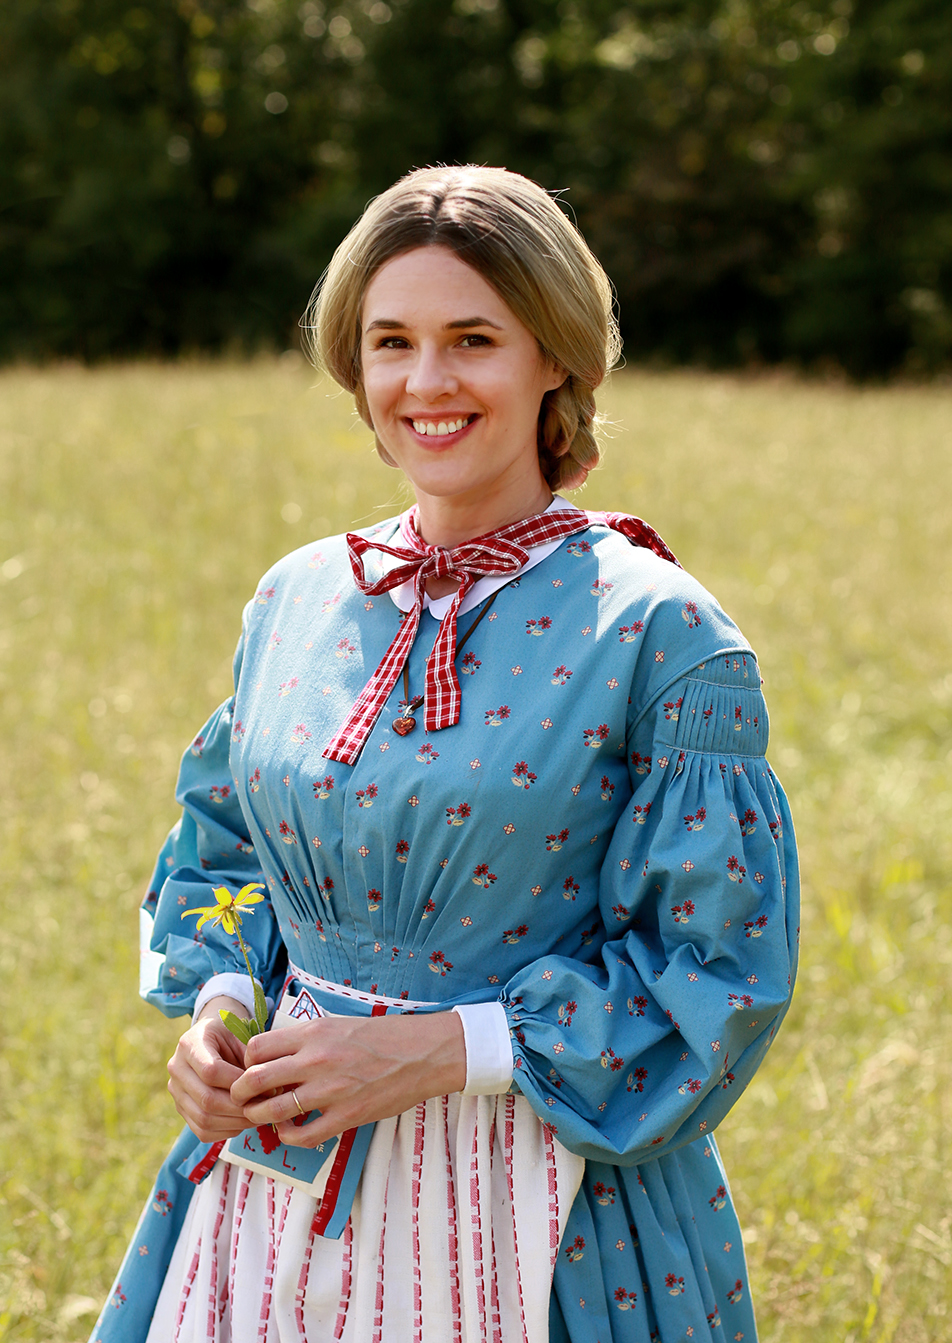
Let’s start with the obvious: for my woman’s interpretation of the birthday dress, I have chosen not to wear a pinafore style apron. I’ve made this decision for a couple of reasons: firstly, pinafores, like the one worn by Kirsten are almost entirely worn by younger girls (like I did in my childhood version, 28 years ago!) Secondly, if an adult women did wear an apron, it would have almost always been a practical work time covering for her dress and not a fashion accessory. Of course there are always outlying examples against the rule, but I’m happy with my choice to omit a pinafore from my version of this costume. As with past projects I have found some extant items of what I’m guessing the team at Pleasant Company may have referenced, which you can find on my corresponding research post. (All of my visual examples are on that page, so keep it open to look back to as you read this post!)

Kirsten Cover 5.jpg

Neckline

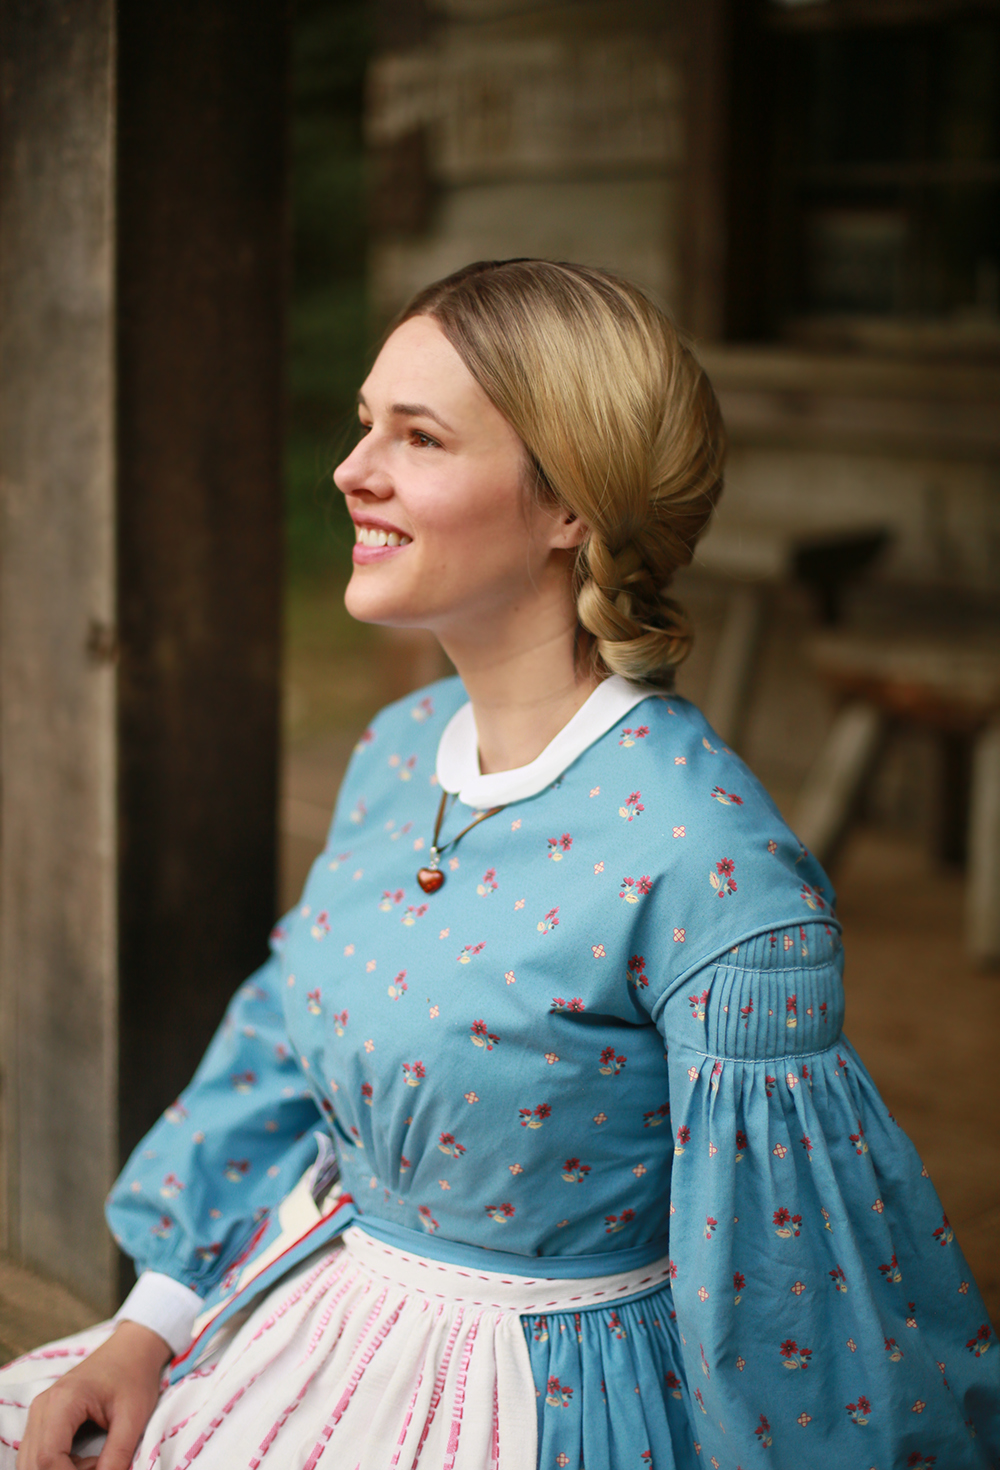
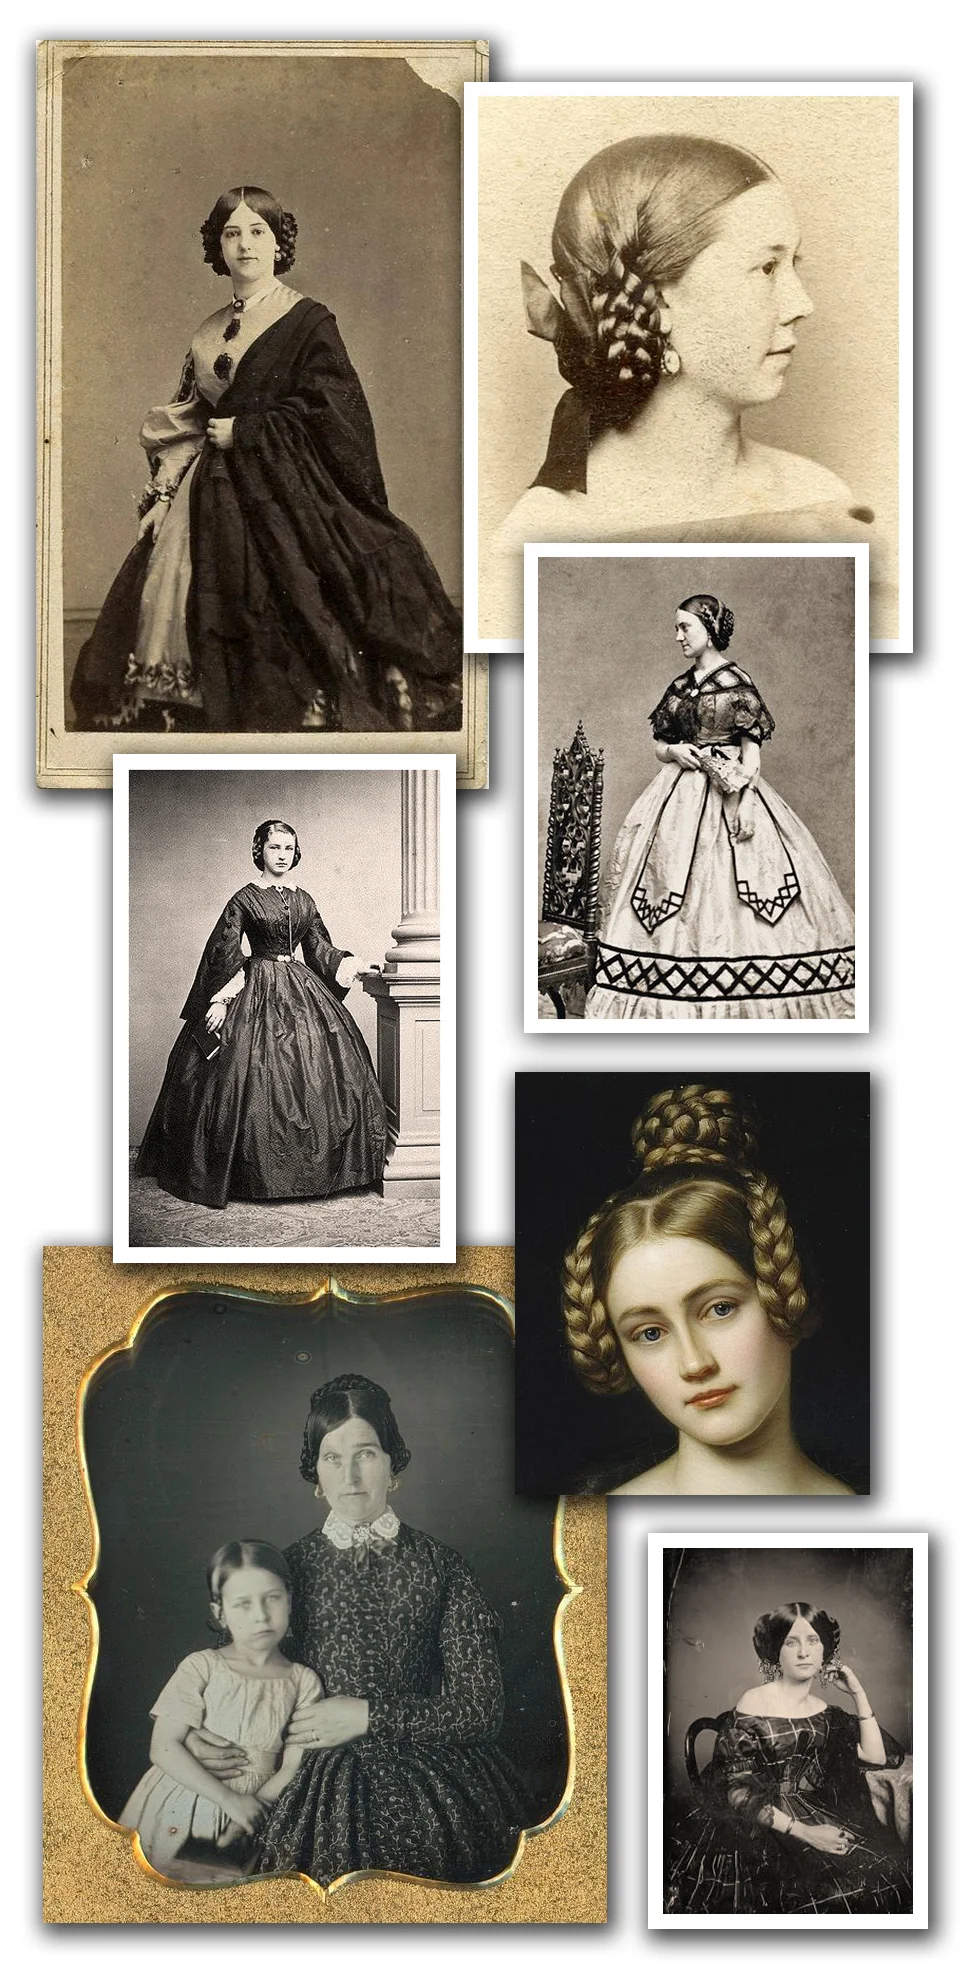
Instead of the high neckline of the Pleasant Company Kirsten birthday dress, I’ve instead opted for a lower and wider shape and I did this to bring some variation to the project. It’s absolutely historically correct for women and girls to have worn high necklines through the 1850s but it’s also correct to see a more open shape. If you look back to my post on popular girl’s silhouettes of this era, you’ll see how this holds true. A wide neck, short sleeve, gathered front dress was incredibly popular through a large majority of the 19th century (example 2, 2.1). Sometimes these open necklines are paired with an additional layer underneath for modesty or morning/afternoon wear (example 3).

Because I’ve omitted the pinafore, I chose to using vintage crochet lace at the neckline with a slight triangular shape. I’ve found examples of this in daguerreotypes (example 4, 4.1) and I think it nicely mirrors the lines of Kirsten’s apron without being childish.

Kirsten C4.jpg

Bodice

My starting point for this dress was a commercial pattern (McCalls 7988) drafted by costumer Angela Clayton, based off of a dress from the Metropolitan Museum of Art (example 5).

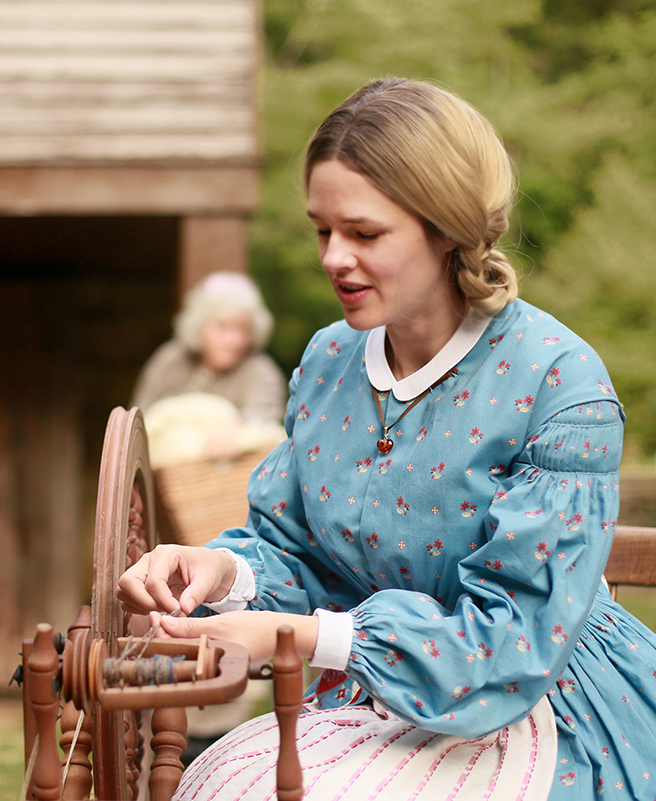
The bodice is composed on a yoke, gathered center front portion and sides that wrap around the torso to a back princess seam and two center back sections. This kind of construction really reminds me of 18th Century Italian gowns because there is no side seam like we see in modern clothing. The yoke also extends over the shoulder just like an 18th century style. If you look closely you can see I paid careful attention to matching my plaid, which meant that I sewed almost every seam by hand to get a perfect flow of the gingham! The bodice is lined in white twill to give it extra strength because the skirt is very heavy. Two boning channels finish out the center back and trouser hooks and bars are sewn to the lining to close the bodice.

Even though I didn’t layer a pinafore over top my dress, check out how the front style lines both narrow in at the waist. This style of bodice was common for both girls and women, as can be seen in examples 6, 6.1.

Sleeve 2.jpg

Sleeves

In her birthday story, Kirsten wears a short sleeved dress. This presents a slight problem for an adult interpretation because women of the 1850s did not often reveal their bare arms during the day - both out of modesty and practicality. For evening attire the rules change as one is surrounded by her peers and may show more skin.

The dropped shoulder attaches to layered upper and lower sleeves and two sets of 36” of ruffles. These two sleeves are stacked on top of one another and then sewn to the shoulder seem. Piping is used throughout. Like the neckline, I trimmed the lower sleeve ruffle with antique hand crocheted trim to refer back to the pointed trim on Kirsten’s apron.

For these photos I’ve decided to style the dress without an under layer because I wanted to capture the look and feel of Kirsten’s birthday dress, but I have posed for a few shots with the dress over a shirt waist - a look shown in many fashion plates from the 1850s (example 7, 7.1, 7.2). I’ll post those in coming weeks on my instagram page.
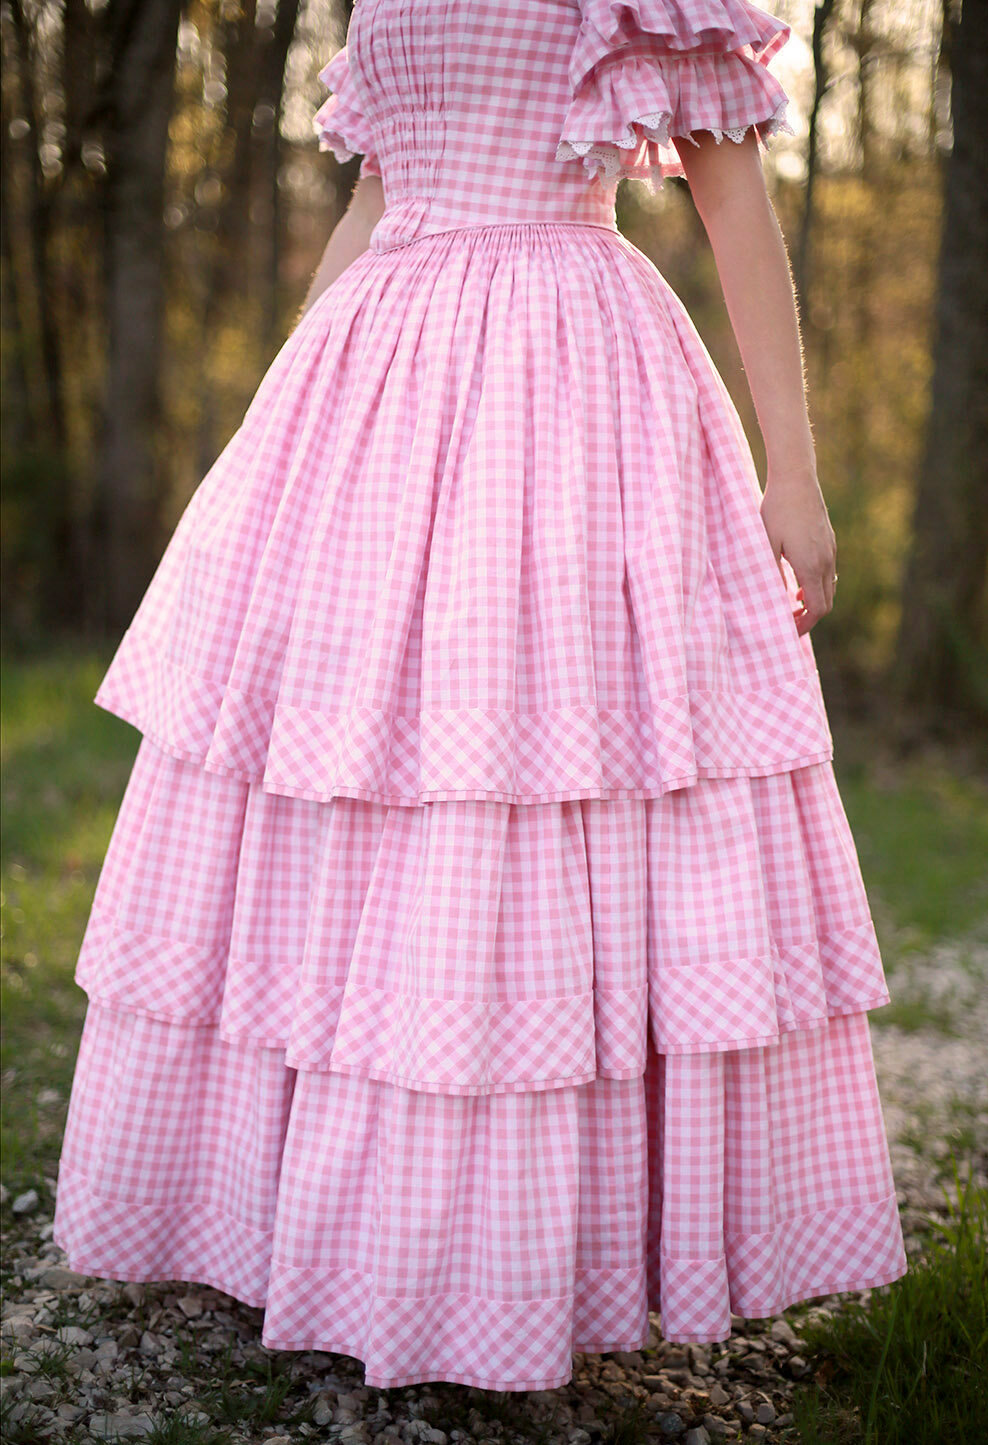
Kirsten Skirt2.jpg

Skirt

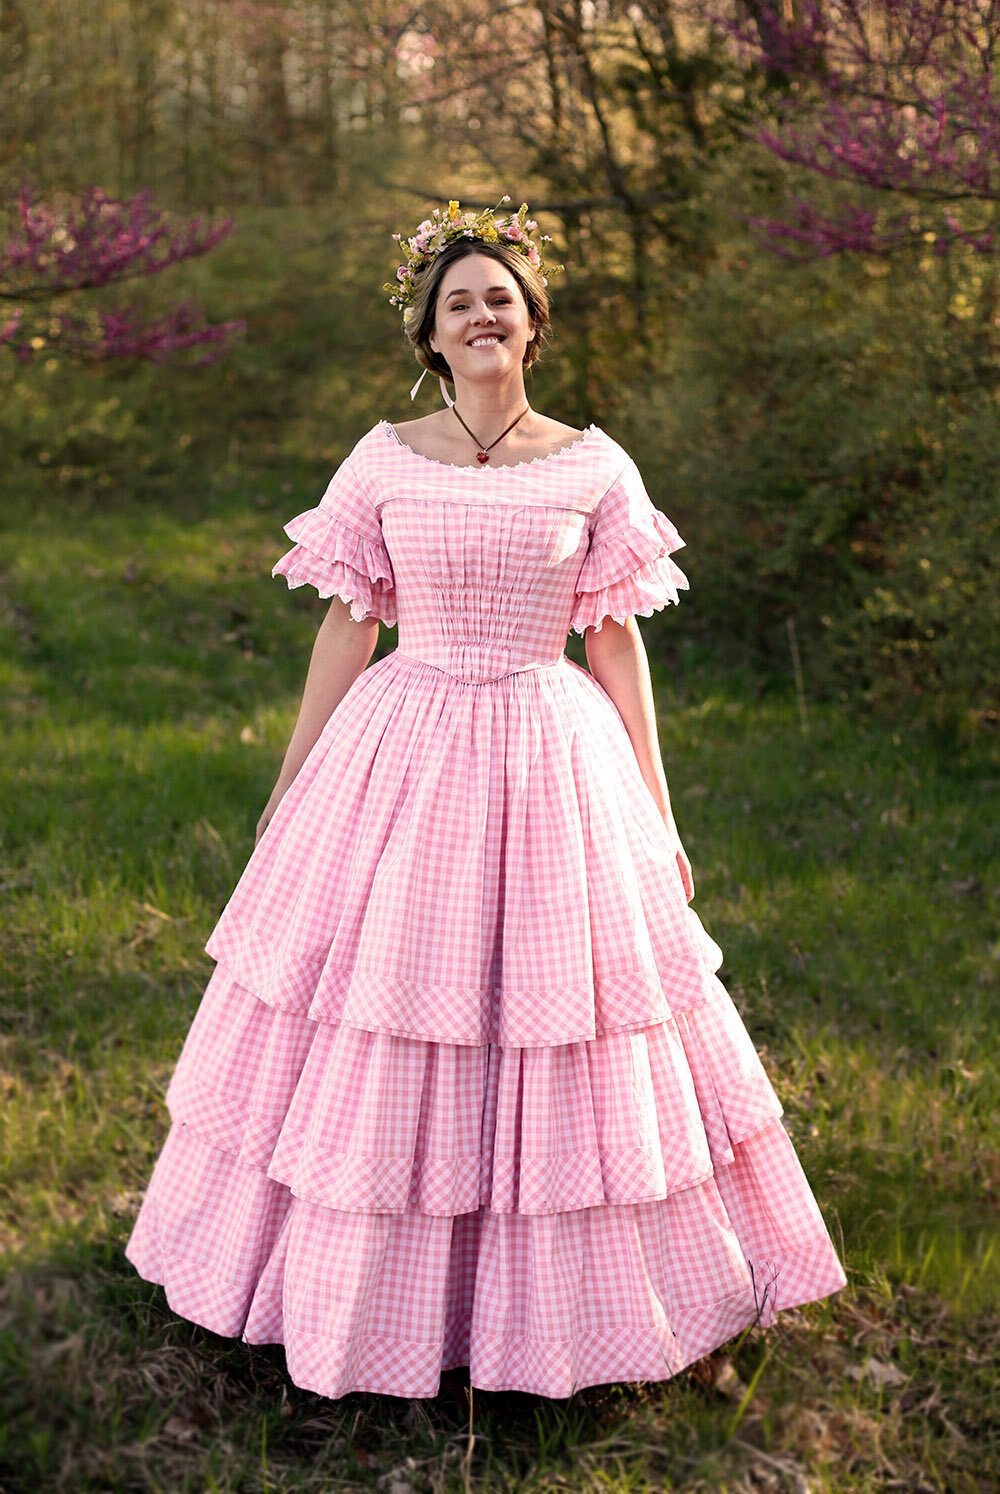
Kirsten’s Birthday outfit by Pleasant Company has three visual layers to her skirt - her pinafore, dress and petticoat. I’ve chosen to interpret these layers into the very fashionable three tiered skirts of the 1850s. The first tier of the skirt is 135” wide and cartridge pleated into the waistline with an additional petticoat underneath that’s built into the dress. Imagine on knee length gingham layer over a white floor length layer (which serves as the base for the second and third layers). I hand sewed the top layer and petticoat to a 1” thick strip of twill tape the length of my waist. That tape was later sewn directly to the twill lining and the bodice was overlapped and hand sewn down to each pleat.

Now back to the bottom layers! I don’t currently have a set of hoops to wear underneath but if I ever add them to my costume kit, they would really extend and widen the look of the skirt! The bottom two layers are 240” wide, gathered, and sewn down directly on the petticoat. Prior to any construction, I marked the placement of the layers. That’s because each tier is hemmed before gathering by turning up the bottom edge and covering it with the 3” wide bias detail (which was appliquéd by hand on top!) This is one element of my costume that doesn’t have any direct reference back to Kirsten’s PC dress, but was an artistic decision that ties back to historical research. (examples 8, 8.1)

Kirsten D3.jpg

Flower Crown

So much of this springtime edition of The Kirsten Project revolves around what was in fashion during the 1850s - color trends (think pink!), gingham fabric, and voluminous tiered skirts. One element that has ties to both fashion and to Swedish culture is Kirsten’s flower crown.

One of Sweden’s biggest (and oldest) celebrations is the summer solstice tradition of Midsummar. Flower crowns are worn by young and old, men, women, boy and girls. The tradition goes that unmarried people pick seven different kinds of wildflowers to make into their crowns and then put them under their pillows to dream of their future spouse. This reminded me of the following passage in Happy Birthday, Kirsten!

“Pick as many daisies as you can!” Anna told everyone. “We’re going to make daisy chains.” All eight girls fanned out across the meadow. It was the day of the barn raising and they were picking wildflowers.”

Kirsten L2.jpg

“Happy Birthday, Kirsten!” Lisbeth said. She placed a wreath of flowers on Kirsten’s head. The blossoms tickled Kirsten’s ears through her long hair. 

And although it’s not part of her outfit, Kirsten’s mom also bakes a cake called Jordgubbstårta, topped with strawberries and fresh cream - a very popular Swedish Midsommar dessert! 

Flower crowns aren’t limited to Scandinavian culture of course. Queen Victoria wore a crown of orange blossoms at her 1840 wedding and First Lady Mary Todd Lincoln wore flowers in her hair for many of her portraits (examples 9, 9.1, 9.2, 9.3). You’ll find floral hair decorations throughout the 1840s-1860s on fashion plates and in lady’s magazines.

In the pioneer spirit of making do with what’s available, I used flowers I could find in my stash of old spring wreaths and intermixed those with faux flowers I bought this winter in preparations for this project. I really love cobbling together what I can find around the house and I don’t think it could have been as lovely if I had bought everything new. And just in case you’re wondering, there are seven different types of blossoms arranged throughout. I’d sleep on it, but I’ve already found my perfect match in my husband Adam, who shot most of these photos (Felix also took a few!!) 

Around my neck I’m re-wearing the amber heart necklace on a brown silk ribbon (I dyed it using walnut husks I collected from my yard!), which was a part of my Meet Kirsten look.
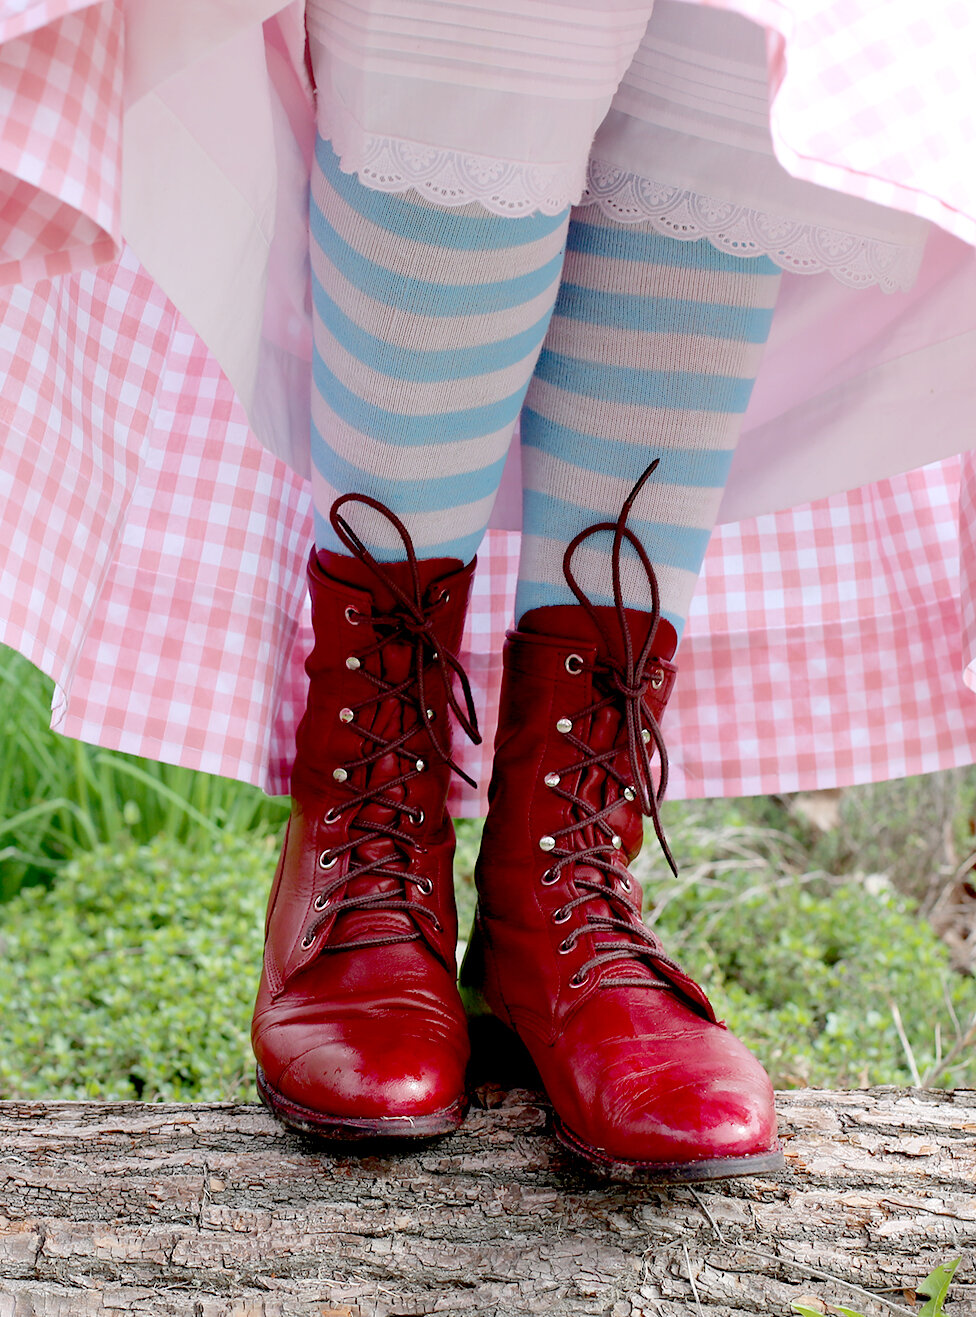
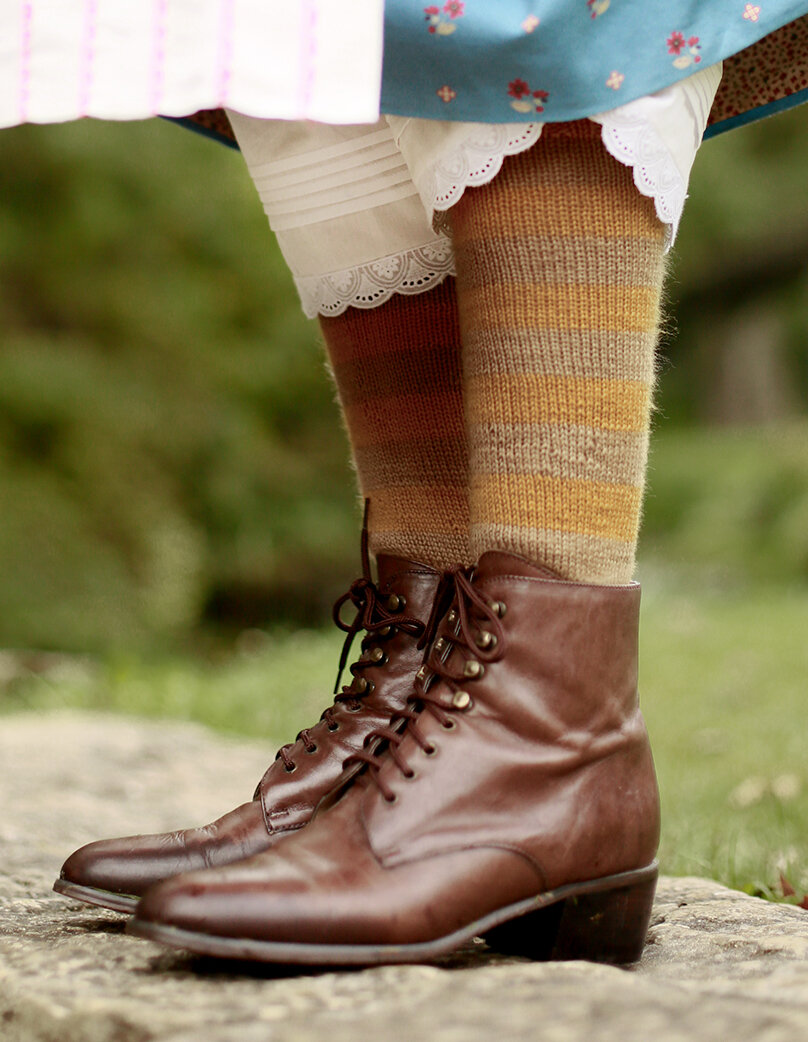
Kirsten Silhouette Flipped.jpg
Socks and Boots 6.jpg
Boots Vertical 3.jpg

Socks and Boots

I’ve always loved the combination of pink with red and Kirsten’s birthday cover outfit is no exception! I searched high and low for weeks to find a pair of vintage Justin lace up boots and actually found them in a shade of taupe on eBay (see the before here)! I used leather dye to give them their rich red hue. Red shoes were popular for Victorian children, although examples of this particular color and style together were difficult to research. More often I found examples that buttoned up the outer ankle, which was a common style of boot at the time. I’m also wearing blue and white striped socks (ready made), just like the cover.

Kirsten Silhouette Flipped.jpg

I hope you’ve enjoyed this springtime installment of The Kirsten Project! Many thanks to those of you who chipped in this winter to help me purchase my fabric and supplies that made this costume possible. And thank you to all of you that have been so encouraging in this process, including the American Girls podcast, the Serious Crafts podcast and every person who has messaged me to share their own American Girl stories over the past months! It feels good to think about a time when I was a child - safe, curious, inspired, and playful. Completing this project, photographing, editing and writing about it - has been a positive light that has kept me from sinking too far into darkness while isolated. Here’s to silver linings, the beauty of a new season and all of the good things to come.

Kirsten J 2.jpg
Kirsten H4.jpg
Kirsten G3.jpg

The Kirsten Project | 1854

Historical Kirsten Costume Jessica Quirk
Kirsten 1854 Pocket Historical
Historical Kirsten Costume Jessica Quirk
Kirsten Larson An American Girl 1854 Costume by Jessica Quirk
Kirsten Larson 1854 Costume Cosplay by Jessica Quirk
Kirsten Larson An American Girl 1854 Costume by Jessica Quirk
Faced Hem, Custom fabric design, 1850s socks and boots, Victorian Lace Up Boots

After months of planning and research, designing and sewing, I am so excited to finally share my finished costume for The Kirsten Project! The goal of this project was to take one of my childhood passions - the pioneer life of my favorite character, Kirsten Larson - and interpret her through a historical lens. I’ve done a deep dive into every aspect of her costume - from her hair and bonnet to her traditional Swedish apron to the printed fabric of her dress and incorporated that research into this look. I’ll link back throughout this post to the background information pertaining to each category or you can click here to read it all now.

Let’s step back in time to 1854!

Kirsten Dress and Cover.jpg
Floral Motif spacer.jpg

Underpinnings

Victorian Era open drawers and chemise Laughing Moon 100

Although not visible in these images, I’m wearing historical undergarments including drawers and chemise (both pictured at right), a corset and a quilted petticoat. The first layer is a pair of open drawers that tie at the waist made out of white cotton. The center front and back seams are left open so using the out house is less of an ordeal (Because of the way the corset falls over the waist and hips, lowering and raising a base layer would have meant removing all of the day’s layers for each visit to the privy.) Busy women didn’t have time for that! Drawers were worn primarily for warmth on the legs and sometimes modesty and are roomy in their cut so nothing feels like it’s out in the open! They have decorative tucks at the hem along with scalloped eyelet trim, just like Kirsten’s.

Over the drawers is a chemise, which looks kind of like a nightgown. Also made of white cotton, It extends to the knee and has some decorative pin tucks at the hem. All women, regardless of social class, would have worn base layers to protect more valuable corsets and outer layers from the sweat and oils of their skin. Like modern undies, most women would have multiple sets to rotate while they may have worn the same dress day in and out. White cotton (or linen) was also able to take a literal beating in the boiling wash water without worry of fading color or making a print dull.

Next is a corset, cut out of lightweight but strong coutil or French Twill. I used the Laughing Moon 100 pattern for all of these pieces and they came together quickly and easily! I always start with my base layers of my costumes first as they can change your measurements by pulling in your waist, lifting your bust and generally smoothing everything out. There’s a huge misconception that wearing a corset is a painful ordeal - it’s not! For me it feels much more comfortable than a bra and gives the support of a back brace. All that said, I don’t do extreme tight lacing - just enough so that my laces are even in back, which only takes in an inch or two.

The last foundation garment is a quilted petticoat which is actually from my 18th century kit. Some things can transverse centuries, others cannot (like stays or corsets!) This petticoat does the job (there are even written mentions of quilted petticoats in the Kirsten series) but if I were to revisit the early Victorian era I’d do a corded petticoat. Caged crinolines and hoop skirts that many associate with the middle of the 19th century begin to appear at the tail end of the 1850s, but primarily in the upper echelons of society before extending to other classes.

If you’d like to see any of these underpinnings in action, you can view them here.

Floral Motif spacer.jpg

Dress

Kirsten Larson Cosplay 1854 custom fabric design

After completing the base layers of my look, I normally move to the dress next. However for this costume, I had more to do than just test fit the pattern and cut my material - I actually designed the fabric and had it printed to resemble Kirsten’s dress!

Using my doll as my inspiration, I looked at historical prints from the 1850s until I found something that reminded me of the small red flowers. You’ll see a key difference is the color palette of the background - most come in shades of ecru and brown - but there are some examples of blue from the era. Check out my research post to see what I mean! From my inspiration pieces, I sketched out the floral motif, scanned it in, digitalized it and then added the small red and pale gold cross into the design.

Once I had a repeat I was happy with, I used my color map from Spoonflower to pick colors that were close to the original dress. A week later, with the printed fabric swatches in front of me I saw that the colors were close, but the scale was WAY too large. My goal was to have the same number of repeating floral motifs across the upper chest for my dress as the doll’s dress (there are six!) so I went back to my laptop and made three more smaller scales of the print along with switching up a color or two. I am so glad I took the extra time to do a few test rounds! Another update I made after my first round of swatches was to add a dotted background in a shade of blue slight darker than the ground. I wanted to get the Kirsten look, but almost all of the 1850s prints I found were very busy with not a lot of plain ground showing through. It took quite a bit longer for these swatches to arrive but when they did I had the perfect sample and I knew I was ready to make the larger investment in six yards of fabric.

Sleeve Detail of Fig Leaf 201 Sumter County Historical Dress circa 1856 S

Speaking of investing, let me take a moment to thank to the many people who chipped in to support this project to get early access via instagram. Because of your contributions I was able to go the extra distance with the dress fabric to really capture Kirsten’s spirit. Those funds also went towards supporting many other small and female owned businesses in the form of buying indie patterns, trims and accessories! And it wasn’t just the dollars and cents, it was the encouragement and enthusiasm of my patrons that I’m really grateful for! Thanks for validating this idea and rallying behind it!

Now back to the dress! I used Fig Leaf Patterns 201 based on an extant dress in the Sumter County Historical Museum collection, dating between 1956-1962. I loved making this dress, especially the pleating throughout! Like Kirsten’s dress there is a high round neckline, dropped shoulders with piping at the sleeve head, full sleeves and a fitted cuff, a slightly raised waistline, full skirt and contrast hem facing.

I also did something new to me for the hemline - Instead of just turning the bottom of the skirt up to be level with the ground, I folded back the top waistline edge of the skirt before I did my running stitches for the cartridge pleats. To determine how deep to fold it, I found the the shortest part of my bodice and measured the difference at center front (a little over two inches long). This told me the back of my skirt would be turned just a half inch, while the front would be much deeper. This wasn’t as complicated as it sounds and allowed me to have an even row of the print all the way around the hem. I love how well it all turned out!

One final note on my colors! The blue of my print was beautiful, but a little more vibrant than I wanted. I did a few dips in a tea bath to get the shade to come down a little and the end result was exactly right. And if you’re wondering, I was able to use my swatch yardage for my piping as well as my pocket bag. I’m even considering ordering a little more to make Bea a tiny version of Kirsten’s new country dress!

Historical AG Kirsten running in Field, custom 1854 dress by Jessica Quirk
Floral Motif spacer.jpg

Accessories

I’m a strong believer that the accessories make the look when it comes to any historic ensemble. I’ve posted my research on Kirsten’s bonnet and hairstyle, apron and pocket. Now let me tell you a little more about how I made them!

Historical Kirsten Larson 1854 Accessories Bonnet Spoonbag and Apron

Bonnet

For my bonnet, I kept the red and white check like Kirsten’s in mind, but veered towards a different plaid than the doll or the book illustrations. The kind of check I ultimately used was a common weave during the 19th century - see how similar it is to the example I posted in my research?

My plaid came from a second hand men’s button down that I picked up for a couple dollars. I made my own simple pattern, working from a poster board brim that I mocked up. I also chose to make a corded bonnet, using stitched channels filled with cotton cording to give the bonnet brim more stability. Sewing them in place made me so dizzy!! I love the way my final bonnet so closely mirrors the extant versions, but the style in general feels a little matronly to me, which is why I opted not to wear it in all of my photos.

Hair

As I mentioned in my research post, one of the elements of Kirsten’s character that doesn’t vibe very will with historical research are her thick blunt bangs. The look of the time was a center part with hair covering the ears. You can read more about where the inspiration for Kirsten’s looped braids probably came from here, but for my style I wanted to capture something historically accurate. My long braids are plaited right beneath my ears and then each side is tucked up under the base of the opposite side. I feel like I’ve achieved how an adult Kirsten may have styled her blond locks!

Amber Necklace

I wasn’t able to get any historical research to back up the amber necklace Kirsten wears throughout her series, but it’s my best guess that each girl/doll had a heart shaped accessory so this was the best fit for Kirsten. I bought my small amber pendant on eBay and wore it from a narrow silk ribbon. To get the perfect shade of brown, I dyed 1/8” white silk ribbon using black walnuts from my own front yard! It’s my experience that the flesh of the green walnuts oxidizes to make the best dye but I used some dried husks too! I dyed the ribbon by submersing it along with the walnuts in boiling water for about 2 hours.

Kirsten's Pocket with Hand Embroidery, Hankie, Amber Heart Necklace

Loose Pocket

This is one portion of my project that brings together the doll’s accessory with a lot of research and a little creativity. Loose pockets, or kjolsäk, vary in shape but many of them are rounded, some look like 18th century pockets and a few others are square. Almost all extant pockets have red elements (usually on a black ground) but my assumption is that Kirsten’s pocket palette is strongly influenced by her American red, white and blue color scheme.

I thought about the many ways I could approach this piece - Should I make it more similar to an extant pocket? Should I copy Kirsten’s spoon bag identically? In the end, I scaled up my doll’s pocket to get the perfect proportions, but made my embroidery a little more intricate and special. You can imagine that the doll’s pocket was mass produced and thus rather simple. In place of the little stars on her pocket I did Scandinavian inspired embroidery instead. I also did the date with a little more of a flourish similar to what I saw on existing examples. Around the appliquéd red heart I added embroidered scallops. I kept Kirsten’s simple initials, which was very common on the historical examples I found in my research.

Inside the pocket is a small wooden spoon (in some of the photos) and a hankie. Pleasant Company/American girl says pioneers had limited cutlery and took it with them when visiting (probably true) but I didn’t find any of my own research saying as much. Some sources mentioned carrying money or candy in the bag or even bread for extra long church services.

I also folded up a hankie that I embroidered to look similar to Kirsten’s, which we learn in book two is an example of her own sewing work. Mine was a quick project I took on while I was waiting for other materials to arrive in the mail and was also done using scraps of both fabric and leftover embroidery floss from the pocket.

1850s Woman on Front Porch with Apron Drop Shoulder Dress Trek Costume

Apron

Kirsten’s red and white striped apron, or förkläde, was one piece I thought would be pretty straight forward, but ended up being a topic I researched in depth! This is one element of Kirsten’s look that is very Swedish with loads of examples in existing museum pieces, Swedish art and photography. Check out my research post if you want to learn more!

Knowing that this piece was homespun, woven and passed through generations, I didn’t want my apron to be made of a print or lightweight fabric weave - I wanted it to feel thicker and have more substance. I spent hours on Etsy looking through pages and pages until I finally found this vintage Swedish textile, which looks very similar to the cover of Meet Kirsten! It was the perfect size to gauge pleat and sew into a simple 1” wide twill ribbon waistband. I added a simple chunky running stitch alongside each red stripe to enhance it and also sewed additional running stitches on the waistband.

1850s Socks Boots and Drawers Kirsten Project

Socks

After spending so much time on all of the above accessories, I knew I couldn’t go the easy route with some school spirit striped socks from the craft store, so I commissioned these from the Pointed Needle via Etsy. Once I saw Ralyne’s work, I asked her for a bid and we agreed on a price plus the cost of materials. Even though I knit, I knew I’d rather have someone who specialized in socks to make these. They turned out amazingly and look so similar to the doll’s socks! I did give them a light tea bath to give the gold even more age and the end result looks great!

Boots

I really lucked out by finding these secondhand but seemingly unworn boots on Poshmark! I initially wanted to dye some boots I bought years ago until I realized they had a three inch heel and wouldn’t enhance the costume. They look so similar to an antique pair displayed at Spring Mill too! I called this style ‘granny boots’ as a girl and wore a black pair similar to these with everything in my closet. History repeats itself, people! This pair fit perfectly and were a really reasonable $30, including shipping!

Kirsten Larson Costume at Spring Mill State Park 19th Century Costume
Kirsten Larson An American Girl 1854 Costume by Jessica Quirk
Kirsten 1854 Pocket Hand Made Kjolsack Costume
Kirsten Larson An American Girl 1854 Costume by Jessica Quirk
Floral Motif spacer.jpg

You can probably see it written all over my face - I am so thrilled with how this entire project unfolded. I never thought I could do such a historical and cultural deep dive into the outfit of my favorite childhood character. This was a dream project in every way. The Kirsten Project ticked off so many boxes for me - research, planning, history, design, sewing and creativity. I’m so happy I did this!!

And now, as I look through all of these photos and write all of these words, it occurs to me that almost every single part of this plan just felt right. From designing the fabric to finding the perfect boots online everything came together as if it were meant to be.

Kirsten Larson 1854 Spinning Wheel at Spring Mill State Park in Mitchell Indiana

When we shot the first half of these photos at Spring Mill State Park, we had the Pioneer Village to ourselves until the costumed volunteers showed up and graciously offered us props and cheerful hellos (you really never know how people will react when you’re in costume!) For the second part of the shoot we wanted a prairie field setting with long grasses and wild flowers and a sunny day for back lighting. Because of schedules, we had a tight window to shoot (never mind the grass being mowed down for fall any day now). We could have the location but we couldn’t control the light. It was pretty overcast when we headed out, but as Adam started testing camera settings, the skies cleared to blue and the sun came shining down. I could not believe our luck!!

Thanks to my husband Adam for all of the love and encouragement on my costume projects, which mean a messier house, more cooking for him, straight pins covering the floors in every room and a general mess of our dining room table for a couple of months. He took all of these incredible photos and captured my vision for this project so perfectly, and I am so grateful for all of it and more.

And with that, the Kirsten Project is complete! I hope you’ve enjoyed this series and I look forward to my next big project, whatever that may be.

Kirsten Larson 1854 costume designed by Jessica Quirk
Floral Motif spacer.jpg

The Kirsten Project | Hair and Hat Inspiration

Braided Hairstyles of the 19th Century.jpg
Little Lie-A-Bed's Sad Breakfast by carl larsson 1900

Little Lie-A-Bed's Sad Breakfast by carl larsson 1900

One of the most iconic parts of Kirsten’s character are her signature looped braids. My hair never got long enough to make it work as a kid, so I’m determined as ever to make it happen now. So why looped braids? I got my first answers to this question when I started chatting with Renée Graef (illustrator of the Kirsten series) about the work of Carl Larsson. As I went down the rabbit hole, I found Carl had a daughter named Kersti. Kersti Larsson = Kirsten Larson!! Two of his other daughter’s names, Lisbeth and Brita, show up as a cousin and sister of Kirsten in the series as well! When you look at Carl Larsson’s work you’ll be able to spot Kersti right away and it’s all about that blond hair and those darling braids. Renée also told me Larsson’s artwork was very influential across Pleasant Company and he remains one of her favorite artists even today. In a previous post I wrote about another iconic Kirsten accessory - her striped apron - which is visible in many of Carl Larsson’s pieces as well! If you’re looking to go down a rabbit hole of beautiful artwork, get Googling on Carl Larsson and you’ll fall in love with his family, their home and lives. My guess is that the costume seen in his artwork had a strong influence on some of Samantha’s wardrobe as well!

KERSTI in black by carl larsson 1905

KERSTI in black by carl larsson 1905

KERSTI’S FRIEND COMES VISITING by CARL LARSSON 1905

KERSTI’S FRIEND COMES VISITING by CARL LARSSON 1905

The real Kersti Larsson was born in 1896, so before I started braiding my hair, I wanted to get a better idea of what looped and braided styles were common half a century earlier, in the 1850s. Luckily, early photography, like daguerrotypes, were hitting their stride by this time and I have a lot of examples to refer back to.

Queen Victoria’s Looped Braids of the 1840s.

Queen Victoria’s Looped Braids of the 1840s.

One thing you’ll notice right away is that full thick bangs like Kirsten’s were not in style. My assumption is that all of the original dolls needed to have the same wig (even if they are different colors) and that’s why Kirsten came with bangs. Not that a pioneer gal couldn’t chop some fringe (I vaguely remember a scene in the Little House books when a girl is scolded for cutting hers), but I’ve decided not to wear bangs for my version.

Bangs were also a popular hairstyle for girls in the 1980s. I know! I had them as a little girl!

Many of these versions appear to have been influenced by the braids worn by Queen Victoria in the 1840s (center parted pair of braids swoop down and hang near or below the ears before being pinned back into another braided section of hair from the back of the head), but you see the same look well into the 1860s. With the additional of the red checked bonnet, this style seems perfect for the grown up version of Kirsten.


Mid 19th Century Corded Bonnets.jpg

Atop those classic blond braids Kirsten wore a red checked bonnet. The book’s illustrations, along with the doll’s accessories feature a red and white gingham with a soft brim and short back bavolet, or curtain to shade the neck. My sunbonnet will be inspired by Kirsten’s in that it’s red checked (made from a second hand men’s shirt) but differ in the following ways: I’ve chosen to orient my brim fabric on the bias as seen in the two extant versions pictured above. I’ve also decided the brim will be corded, which is also shown in all of these examples. I’ve decided to go with a happy medium regarding the bavolet length, primarily for personal aesthetic choices. I know it needs to be long enough to protect one’s neck from the sun, but I also don’t love the super long versions. Mine measures a smidge over six inches and looks nice with my pair of looped braids!